Section 1 - Introduction
Section 2 - Basics
Section 3 - Next Level
Section 4 - Advanced
Fancy Lists
Forms
Advanced Tables
Frames
Style Sheets
Image Maps
Why Image Maps?
Suitable Images
Select Hot Spots
The Code
Examples
You try it
Section 5 - Publishing
Section 6 - Extras
Appendices
|
Now that you know how to define circles, polygons and rectangles as hot spots, you are now prepared to learn the code to create an image map.
Here's the first part of the code:
-
<map>
and of course
-
</map>
As you may suspect, it's a little more complicated than that. You need to give your map a name. You may name your map anything you'd like, but I recommend making it short and to the point. Let's name this map "spot" just to be clever.
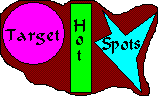 After we give the map a name, we need to define the areas we've selected as hot spots. Simply enough, they're called areas. Let's use the boring but easy map we made in the last lesson. Note that there are three areas we would like to select as targets. Let's put these into the code: After we give the map a name, we need to define the areas we've selected as hot spots. Simply enough, they're called areas. Let's use the boring but easy map we made in the last lesson. Note that there are three areas we would like to select as targets. Let's put these into the code:
-
<map name="spot">
<area>
<area>
<area>
</map>
Notice that you don't end the area tags with </area>. Now we must define the areas. Let's start with the left area. First, we specify the shape. The three possibilities are circle, polygon and rect. Why didn't they spell it out? Lazy programmers. The first shape is a circle with coordinates 34,34 for the center and a radius of 30. So we add...
-
<area shape="circle" coords="34,34 30">
There's two more things to add to that circle area. First of all, let's add a title. A title allows the user to see a little more information when the mouse moves over the hot spot. Second, let's make it a link. Like any link, it can attach to a different page, a different area on the same page, or a different site completely. Let's link it to the Google website. So now we have:
-
<area shape="circle" coords="34,34 30" href="http://www.google.com" title="Your mouse is over the circle. This is a link to Google.">
Ok, we're done with the circle. Rectangles are easy. Let's define the rectangle next. It has upper left coordinates at 70,3 and lower right at 91,92. We'll link it to a page I made called "rectangle.html" and title it "Go here."
-
<area shape="rect" coords="70,3 91,92" href="rectangle.html" title="Go here.">
Finally with the polygon, we noted that the coordinates are 102,10 125,35 156,11 136,58 141,92 94,42 111,33. Let's make that link to the bottom of this page to a link we named "sugar." Let's title it "Go down polygon."
-
<area shape="polygon" coords="102,10 125,35 156,11 136,58 141,92 94,42 111,33" href="#sugar" title="Go down polygon.">
Let's put all that together. You'd see:
-
<map name="spot">
<area shape="circle" coords="34,34 30" href="http://www.google.com" title="Your mouse is over the circle. This is a link to Google.">
<area shape="rect" coords="70,3 91,92" href="rectangle.html" title="Go here.">
<area shape="polygon" coords="102,10 125,35 156,11 136,58 141,92 94,42 111,33" href="#sugar" title="Go down polygon.">
</map>
And when you put all of that into a document, you get...
NOTHING
Don't panic though, there's only one more line to learn. Ses, so far you've defined the map, but you haven't put the picture into the document yet. The picture we're using is called "targetspots.gif" and we need to tell the computer that we're using the image map we named "spot" to apply to our picture. Here's how we do that:
-
<IMG SRC="targetspots.gif" USEMAP="#spot" BORDER="0">
Yeay! Here's the code all together:
<map name="spot">
<area shape="circle" coords="34,34 30" href="http://www.google.com" title="Your mouse is over the circle. This is a link to Google.">
<area shape="rect" coords="70,3 91,92" href="rectangle.html" title="Go here.">
<area shape="polygon" coords="102,10 125,35 156,11 136,58 141,92 94,42 111,33" href="#sugar" title="Go down polygon.">
</map>
<IMG SRC="targetspots.gif" USEMAP="#spot" BORDER="0">
|
And you see...
|


