Section 2 - Basics
Section 4 - Advanced
Fancy Lists
Forms
Advanced Tables
Frames
Style Sheets
Background
Text, Dimension
Border
Padding, list
Classification
Positioning
Misc.
Multiple CSS
You try it
Image Maps
Section 5 - Publishing
Section 6 - Extras
Appendices
Note: the top section of this page may not work on all computers. If all of the pictures look alike, it isn't working on your computer. Geocities may prevent this from functioning correctly.
It is not recommended to use style sheets to edit pictures, but it's possible. One of the easiest ways is to edit off the right side of a picture. To do this, all you need to do is specify how big your picture should be.
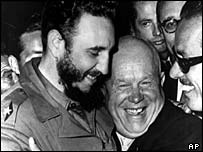 Here is a happy picture of Fidel Castro and Nikita Kruschev. Suppose you'd like to trim this picture to just contain the bearded face of Fidel. To do this, you'd have to trim the right side, bottom, and left sides. I wouldn't trim anything off of the top for fear of losing his hair. If this is what I wanted, I would use the following code:
<style type="text/css">
Here is a happy picture of Fidel Castro and Nikita Kruschev. Suppose you'd like to trim this picture to just contain the bearded face of Fidel. To do this, you'd have to trim the right side, bottom, and left sides. I wouldn't trim anything off of the top for fear of losing his hair. If this is what I wanted, I would use the following code:
<style type="text/css">img.pod {clip:rect(00px 118px 130px 30px)}
</style>
And in the body,
<img src="castro.jpg" class="pod" align="right">
By tampering with the margins, you can narrow in on any part of the picture you'd like. But note that the picture is all still there. The borders and white-space takes the same area as the original picture, but only the part designated will show up. Here's another example of the same picture with the following margins:{clip:rect(35px 170px 140px 100px)}
Absolute positioning
Another nifty trick of CSS is to position items exactly where you want them. This can be done with text, with headings, with pictures, tables, or any item on a page.
Let's say you'd like a heading of size h1 placed 100 pixels down from the top of the page, and 50 pixels in from the left of the page. You also want a paragraph that begins at 200 pixels from the pot and 100 pixels from the left. Here's how the code would look in the head of the document:
-
<style type="text/css">
h1.set {position: absolute; top: 100px; left: 50px}
p.set {position: absolute; top: 200px; left: 100px}
</style>
-
<h1 class="set"> This is the heading</h1>
<p class="set"> This is the paragraph</h1>
Overflow
Using style sheets, you can limit the size of a paragraph, division, or object. That shouldn't be a surprise, but what if you want to be able to scroll through that section? Easily enough, you state what you want to happen to the overflow.
Here's the code I'd put into the heading of a document if I wanted a little box of information. We'll see what you can do with this on the next link:
-
<style type="text/css">
div.limit {background-color:#00FFFF; width:150px; height:150px; overflow: scroll}
</style> And in the text - <p class="limit">
This is text inside the division
<img src="penga.jpg">
That was a picture inside the division. You can put a lot of things in a division
</div>
Double Background Images
Just as you can place text on top of other text, you can do the same with pictures. That would get more than distracting if I showed that to you here, so I made another page.
Text Behind a Picture
Just as you can put pictures behind text, you can put them in front too. See the last lesson if you don't know how. Here I'll take you to a page that shows how to use images in front of text effectively.

|

|

|